Expensify Playbook For Small To Medium Sized Businesses
Overview
This guide provides practical tips and recommendations for small businesses with 100 to 250 employees to effectively use Expensify to improve spend visibility, facilitate employee reimbursements, and reduce the risk of fraudulent expenses.
- See our US-based VC-Backed Startups if you are more concerned with top-line revenue growth
Who you are
As a small—to medium-sized business owner, your main aim is to achieve success and grow your business. To achieve your goals, it is crucial that you make worthwhile investments in your workforce and your business processes. This means providing your employees with the resources they need to generate revenue effectively while also adopting measures to guarantee that expenses are compliant.
Step-by-step instructions for setting up Expensify
This playbook is built on best practices we’ve developed after processing expenses for tens of thousands of companies around the world. As such, use this playbook as your starting point, knowing that you can customize Expensify to suit your business needs. Every company is different, and your dedicated Setup Specialist is always one chat away with any questions you may have.
Step 1: Create your Expensify account
If you don’t already have one, go to new.expensify.com and sign up for an account with your work email address. The account is free so don’t worry about the cost at this stage.
Employees really appreciate how easy it is to use, and the fact that the reimbursement drops right into their bank account. Since most employees are submitting expenses from their phones, the ease of use of the app is critical
Robyn Gresham
Senior Accounting Systems Manager at SunCommon
Step 2: Create a Control Workspace
There are three workspace types, but for your small business needs we recommend the Control Plan for the following reasons:
- The Control Plan is designed for organizations with a high volume of employee expense submissions, who also rely on compliance controls The Control plan’s ease of use and mobile-first design can increase employee adoption and participation, leading to better expense tracking and management.
- The plan integrates with a variety of tools, including accounting software and payroll systems, providing a seamless and integrated experience
- Accounting integrations include QuickBooks Online, Xero, NetSuite, and Sage Intacct, with indirect support from Microsoft Dynamics and any other accounting solution you work with
We recommend creating one single workspace for your US entity. This allows you to centrally manage all employees in one “group” while enforcing compliance controls and syncing with your accounting package accordingly.
To create your Control Workspace:
- Go to Settings > Workspace
- Select Group and click the button that says New Workspace
- Click Select under Control
The Control Plan also gives you access to a dedicated Setup Specialist. You can find yours by looking at your workspace’s #admins room in new.expensify.com, and in your company’s workspace settings in the Overview tab, where you can chat with them and schedule an onboarding call to walk through any setup questions. The Control Plan bundled with the Expensify Visa® Commercial Card is only $9 per user per month (not taking into account cash back you earn) when you commit annually. Adopting the Expensify Card with an Annual Subscription gives a 75% discount off the unbundled price.
Step 3: Connect your accounting system
As a small to medium-sized business, it’s important to maintain proper spending management to ensure the success and stability of your organization. This requires paying close attention to your expenses, streamlining your financial processes, and making sure that your financial information is accurate, compliant, and transparent. Include best practices such as:
- Every purchase is categorized into the correct account in your chart of accounts
- Receipts are sent to the accounting package to ensure visibility across the organization and to auditors
- Every expense is accounted for and added to your accounting system on time for the reconciliation of your monthly accounts.
You do this by synchronizing Expensify and your accounting package as follows:
- Click Settings > Workspace
- Navigate to the Connections tab
- Select your accounting system
- Follow the prompts to connect your accounting package
Check out the links below for more information on how to connect to your accounting solution:
“Employees really appreciate how easy it is to use, and the fact that the reimbursement drops right into their bank account. Since most employees are submitting expenses from their phones, the ease of use of the app is critical.”
- Robyn Gresham, Senior Accounting Systems Manager at SunCommon
Step 4: Set category-specific compliance controls
Head over to the Categories tab to set compliance controls on your newly imported list of categories. More specifically, we recommend the following:
- First, enable People Must Categorize Expenses. Employees must select a category for each expense; otherwise, it’s more work for you, and our accounting connections will simply reject any attempt to export.
- For more high-risk, travel-related categories, we recommend setting more strict compliance controls. For example, “Meals & Entertainment” should be set with the following:
- Receipts Required
- Descriptions Required, with Description Hints set - Travel: “What is the business purpose of this expense?” - Meals: “Could you share the business purpose and tag attendees?” - Entertainment: “Could you share the business purpose and tag attendees?”
- Disable any irrelevant expense categories that aren’t associated with employee spend
- Configure auto-categorization, located just below your category list in the same tab. The section is titled Default Categories. Find the right category and match it with the presented category groups to allow for MCC (merchant category code) automated category selection with every imported connected card transaction.
Step 5: Make sure tags are required, or defaults are set
Tags in Expensify often relate to departments, projects/customers, classes, and so on. And in some cases, they are required to be selected on every transaction. In others, something like departments is a static field, meaning we could set it as an employee default and not enforce the tag selection with each expense.
Make Tags Required In the tags tab in your workspace settings, you’ll notice the option to enable the “Required” field. This means that any time an employee doesn’t assign a tag to an expense, we’ll flag a violation and notify both the employee and the approver.
- Note: In general, we take prior selection into account, so anytime you select a tag in Expensify, we’ll pre-populate that same field for any subsequent expense. It’s completely interchangeable, and there for convenience.
Set Tags as an Employee Default Separately, if your workspace is connected to NetSuite or Sage Intacct, you can set departments, for example, as an employee default. All that means is we’ll apply the department (for example) assigned to the employee record in your accounting package to every exported transaction, eliminating the need for the employee to manually select a department for each expense.
Step 6: Set rules for all expenses regardless of categorization
In the Expenses tab in your group Control workspace, you’ll notice a Violations section designed to enforce top-level compliance controls that apply to every expense, for every employee in your workspace. We recommend the following configuration:
Max Expense Age: 90 days (or leave it blank) This will enable Expensify to catch employee reimbursement requests that are far too outdated for reimbursement and present them as a violation. If you’d prefer a different time window, you can edit it accordingly
Max Expense Amount: $2,000 (or leave it blank) This is essentially like setting a daily or individual expense limitation on any employee, regardless of whether the transaction is reimbursable or non-reimbursable. This rule will enable Expensify to present larger expenses with a violation to notify both the submitter and approvers.
Receipt Required Amount: $75 Receipts are important, and in most cases, you prefer an itemized receipt. However, Expensify will generate an IRS-compliant electronic receipt (not itemized) for every expense not tied to hotel expenses. For this reason, it’s important to enforce a rule that anytime an employee is on the road and making business-related purchases at a hotel (which happens a lot!), they are required to attach a physical receipt.
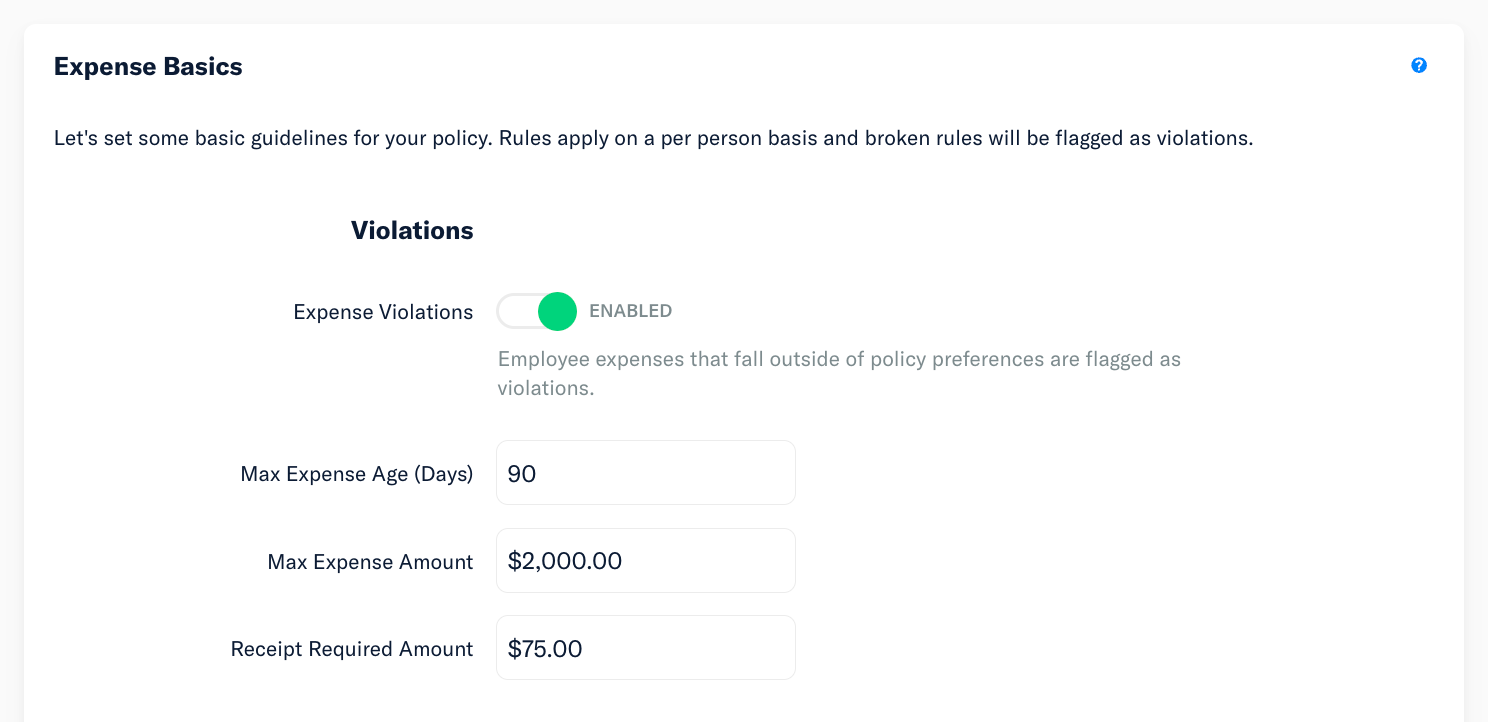
At this point, you’ve set enough compliance controls around categorical spending and general expenses for all employees that you can trust our solution to audit all expenses upfront so you don’t have to. Next, let’s explore how we can comfortably take on more automation while relying on compliance controls to capture bad behavior (or better yet, instill best practices in our employees).
Step 7: Set up scheduled submit
For an efficient company, we recommend setting up Scheduled Submit on a Daily Frequency:
- Click Settings > Workspace
- From here, select a workspace on a Collect Plan
- Within your workspace settings, select the Reports tab
- You’ll notice Scheduled Submit is located directly under Report Basics
- Choose Daily
Between Expensify’s SmartScan technology, automatic categorization, and Receipt Audit features, your employees shouldn’t need to do anything more than swipe their Expensify Card or take a photo of their receipt.
Expenses with violations will stay behind for the employee to fix, while expenses that are “in-workspace” will move into an approver’s queue to mitigate any potential for delays. Scheduled Submit will ensure all expenses are submitted automatically for approval.

We spent twice as much time and effort on expenses without getting nearly as accurate of results as with Expensify.
Kevin Valuska
AP/AR at Road Trippers
Step 8: Connect your business bank account (US only)
If you’re located in the US, you can utilize Expensify’s payment processing and reimbursement features.
Note: Before you begin, you’ll need the following to validate your business bank account:
- Your bank account credentials
- A form of ID (a driver’s license or passport)
- Your business tax ID number, your business address, and your website URL
Let’s walk through the process of linking your business bank account:
- Go to Settings > Account, and select the Payments tab
- Select Add Verified Bank Account
- From here, we’ll ask you to use your online banking credentials to connect to your bank (Note that this must be the account owner or admin credentials)
- Alternatively, you can go the more manual route by selecting “Connect Manually”
- Once that’s done, we’ll collect all of the necessary information on your business, such as your legal business name and address
- We’ll then collect your personal information, and a photo ID to confirm your identity
You only need to do this once: you are fully set up for reimbursing expense reports, granting Expensify Cards, collecting customer invoice payments online (if applicable), and paying supplier bills online.
Step 9: Invite employees and set an approval workflow
Select an Approval Mode We recommend you select Advanced Approval as your Approval Mode to set up a middle-management layer of approval. If you have a single layer of approval, we recommend selecting Submit & Approve. But if Advanced Approval is your jam, keep reading!
Import your employees in bulk via CSV Given the amount of employees you have, it’s best you import employees in bulk via CSV. You can learn more about using a CSV file to bulk upload employees with Advanced Approval here
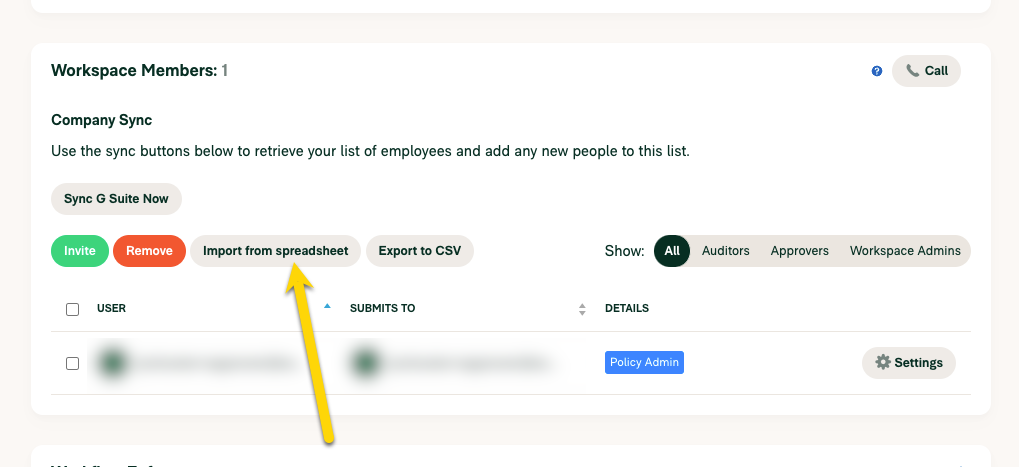
Manually Approve All Reports In most cases, at this stage, approvers prefer to review all expenses for a few reasons. 1) We want to make sure expense coding is accurate, and 2) We want to make sure there are no bad actors before we export transactions to our accounting system.
In this case, we recommend setting Manually approve all expenses over $0
Step 10: Configure Auto-Approval
Knowing you have all the control you need to review reports, we recommend configuring auto-approval for all reports. You’ve already put reports through an entire approval workflow, and manually triggering reimbursement is an unnecessary action at this stage.
- Navigate to Settings > Workspace > Group > [Workspace Name] > Reimbursement
- Set your Manual Reimbursement threshold to $20,000
Step 11: Enable Domains and set up your corporate card feed for employees
Expensify is optimized to work with corporate cards from all banks—or, even better, use our perfectly integrated Expensify Card. The first step for connecting to any bank you use for corporate cards and the Expensify Card is to validate your company’s domain in Domain settings.
To do this:
- Click Settings
- Then select Domains
If you have an existing corporate card
Expensify supports direct card feeds from most financial institutions. Setting up a corporate card feed will pull in the transactions from the connected cards on a daily basis. To set this up, do the following:
- Go to Company Cards > Select your bank
- If you don’t see your financial institution in the list of banks we support, you can review an alternative solution in the Feature Deep Dives section below
- Next, enter your bank account login credentials.
- To successfully connect to your bank, we’ll need the master admin (primary) account login credentials.
- Next, assign the corporate cards to your employees by selecting the employee’s email address and the corresponding card number from the two drop-down menus under the Assign a Card section
- Set a transaction start date (this is really important to avoid pulling in multiple outdated historical expenses that you don’t want employees to submit)
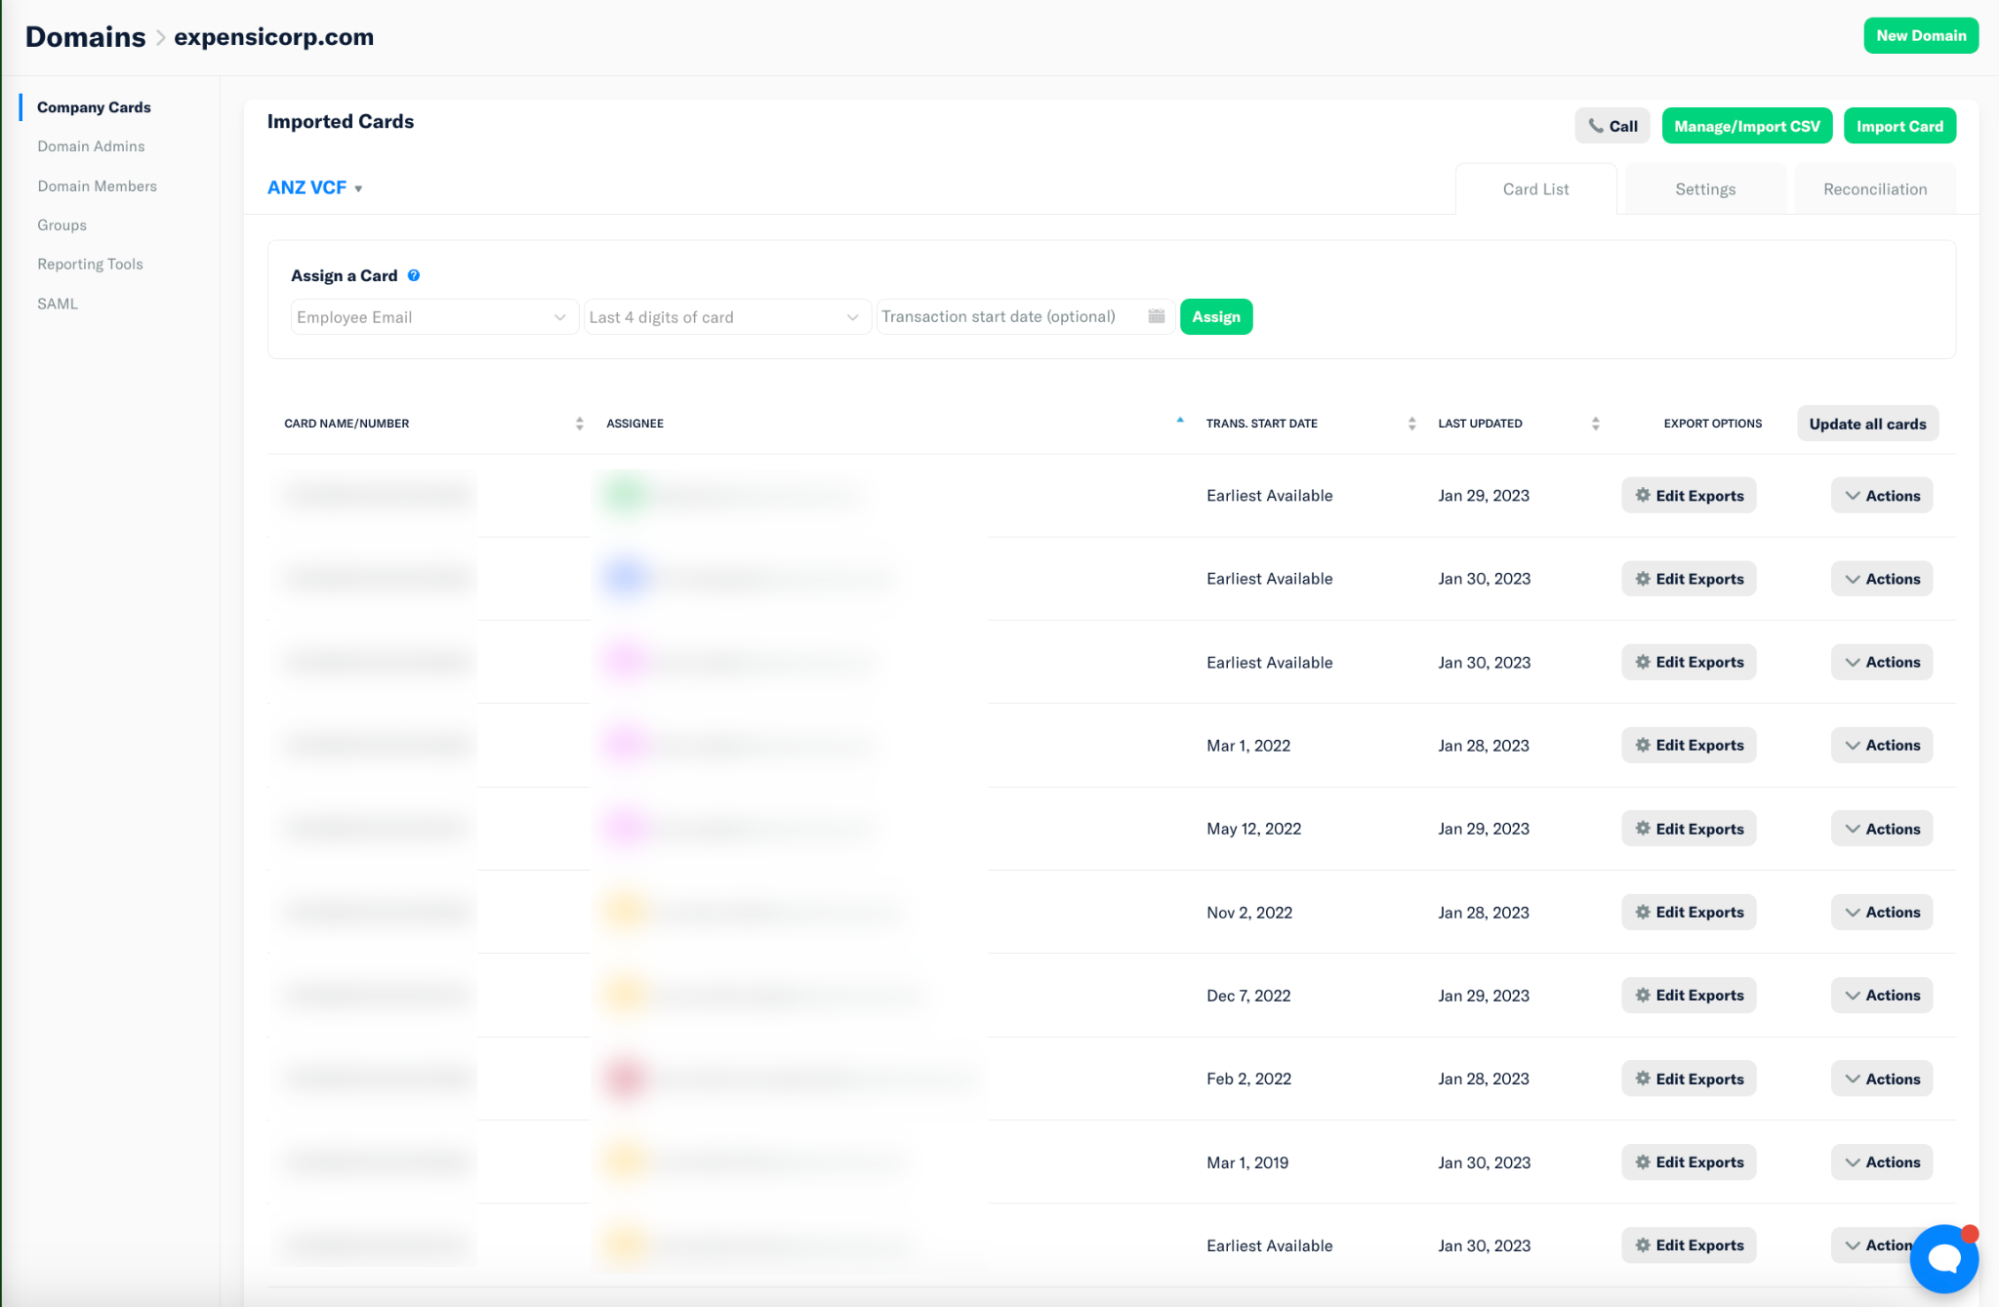
As mentioned above, we’ll be able to pull in transactions as they post (daily) and handle receipt matching for you and your employees. The Expensify Card has many benefits for your company. Two in particular that are worth mentioning are:
-
Seeing transactions at the point of purchase provides you with real-time compliance. We even send users push notifications to SmartScan their receipt when it’s required and generate IRS-compliant e-receipts as a backup wherever applicable.
-
The option to issue Unlimited Virtual Cards with a fixed or monthly limit for specific company purchases (ex., Marketing purchases, Advertising, Travel, etc).
If you don’t have a corporate card, use the Expensify Card (US only)
Expensify provides a corporate card with the following features:
- Finish your expenses in a swipe, we’ll take care of everything else
- Get cash back on every US purchase and up to 50% off your monthly Expensify bill
- Stay in control with realtime alerts, spend limits, and auto-reconciliation
- Don’t worry about credit checks, annual fees, or personal guarantees
- Create unlimited virtual cards with fixed or monthly limits for specific purchases
The Expensify Card is recommended as the most efficient way to manage your company’s spending.
Here’s how to enable it:
- You can apply for the Expensify Card
- Via your tasks on the Home page
- Via Domain Settings - Go to Settings > Domain > Company Cards > Enable Expensify Card
- Assign virtual and physical cards to your employees
- Set SmartLimits:
- Employees - We recommend a low limit for most employees, roughly double the size of the maximum daily spend – such as $1000.
- Execs - We recommend a higher limit for executives, roughly 10x the limit of a non-executive employee (e.g., $10,000).
- You can also issue Unlimited Virtual Cards to any employee. These are single-purpose cards with a set SmartLimit that can be used for specific company purchases
Once the Expensify Cards have been assigned, each employee will be prompted to enter their mailing address so they can receive their physical card. In the meantime, a virtual card will be ready to use immediately.
If you have an accounting system we directly integrate with, check out how we take automation a step further with Continuous Reconciliation. We’ll create an Expensify Card clearing and liability account for you. Each time settlement occurs, we’ll take the total amount of your purchases and create a journal entry that credits the settlement account and debits the liability account - saving you hours of manual reconciliation work at the end of your statement period.
Step 12: Set up Bill Pay and Invoicing
As a small business, managing bills and invoices can be a complex and time-consuming task. Whether you receive bills from vendors or need to invoice clients, it’s important to have a solution that makes the process simple, efficient, and cost-effective.
Here are some of the key benefits of using Expensify for bill payments and invoicing:
- Flexible payment options: Expensify allows you to pay your bills via ACH, credit card, or check, so you can choose the option that works best for you (US businesses only).
- No Cost Feature: The bill pay and invoicing features come included with every workspace and plan. Integration with your business bank account: Once your business bank account is verified, you can easily link your finances to receive payment from customers when invoices are paid.
Let’s go over how Bill Pay works:
- Have your vendors send their invoices to yourdomain.com@expensify.cash.
- This email address comes with every account, so no need to activate it anywhere.
- Once the invoices have been received, we’ll create a bill to pay for your review directly in Expensify
- At the top of the bill, you’ll notice a Pay button. Once you click that, you’ll see options including ACH, credit/debit card, and mailing a physical check.
Similarly, you can send bills directly from Expensify as well.
- From the Reports tab, select the down arrow next to New Report and select Bill
- Next, enter the Supplier’s email address, the Merchant name, the total amount, and the date
- At this point, you can also upload an attachment to further validate the bill if necessary
- Click Submit, and we’ll forward the newly created bill directly to your Supplier.
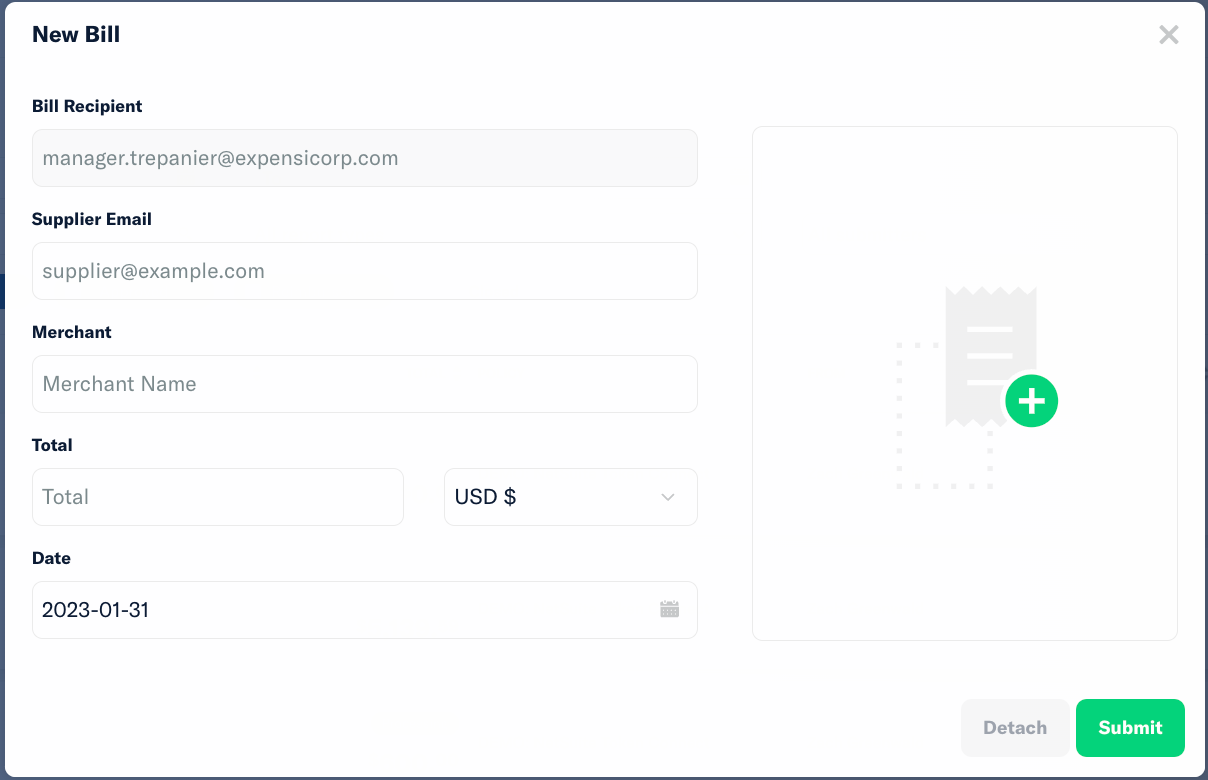
Reports, invoices, and bills are largely the same, in theory, just with different rules. As such, creating a customer invoice is just like creating an expense report and even a bill.
- From the Reports tab, select the down arrow next to New Report and select Invoice.
- Add all of the expenses/transactions tied to the Invoice
- Enter the recipient’s email address, a memo if needed, and a due date for when it needs to get paid, and click Send
You’ll notice it’s a slightly different flow from creating a Bill. Here, you are adding the transactions tied to the Invoice and establishing a due date for when it needs to be paid. If you need to apply any markups, you can do so from your workspace settings under the Invoices tab. Your customers can pay their invoices in Expensify via ACH, Check, or Credit Card.
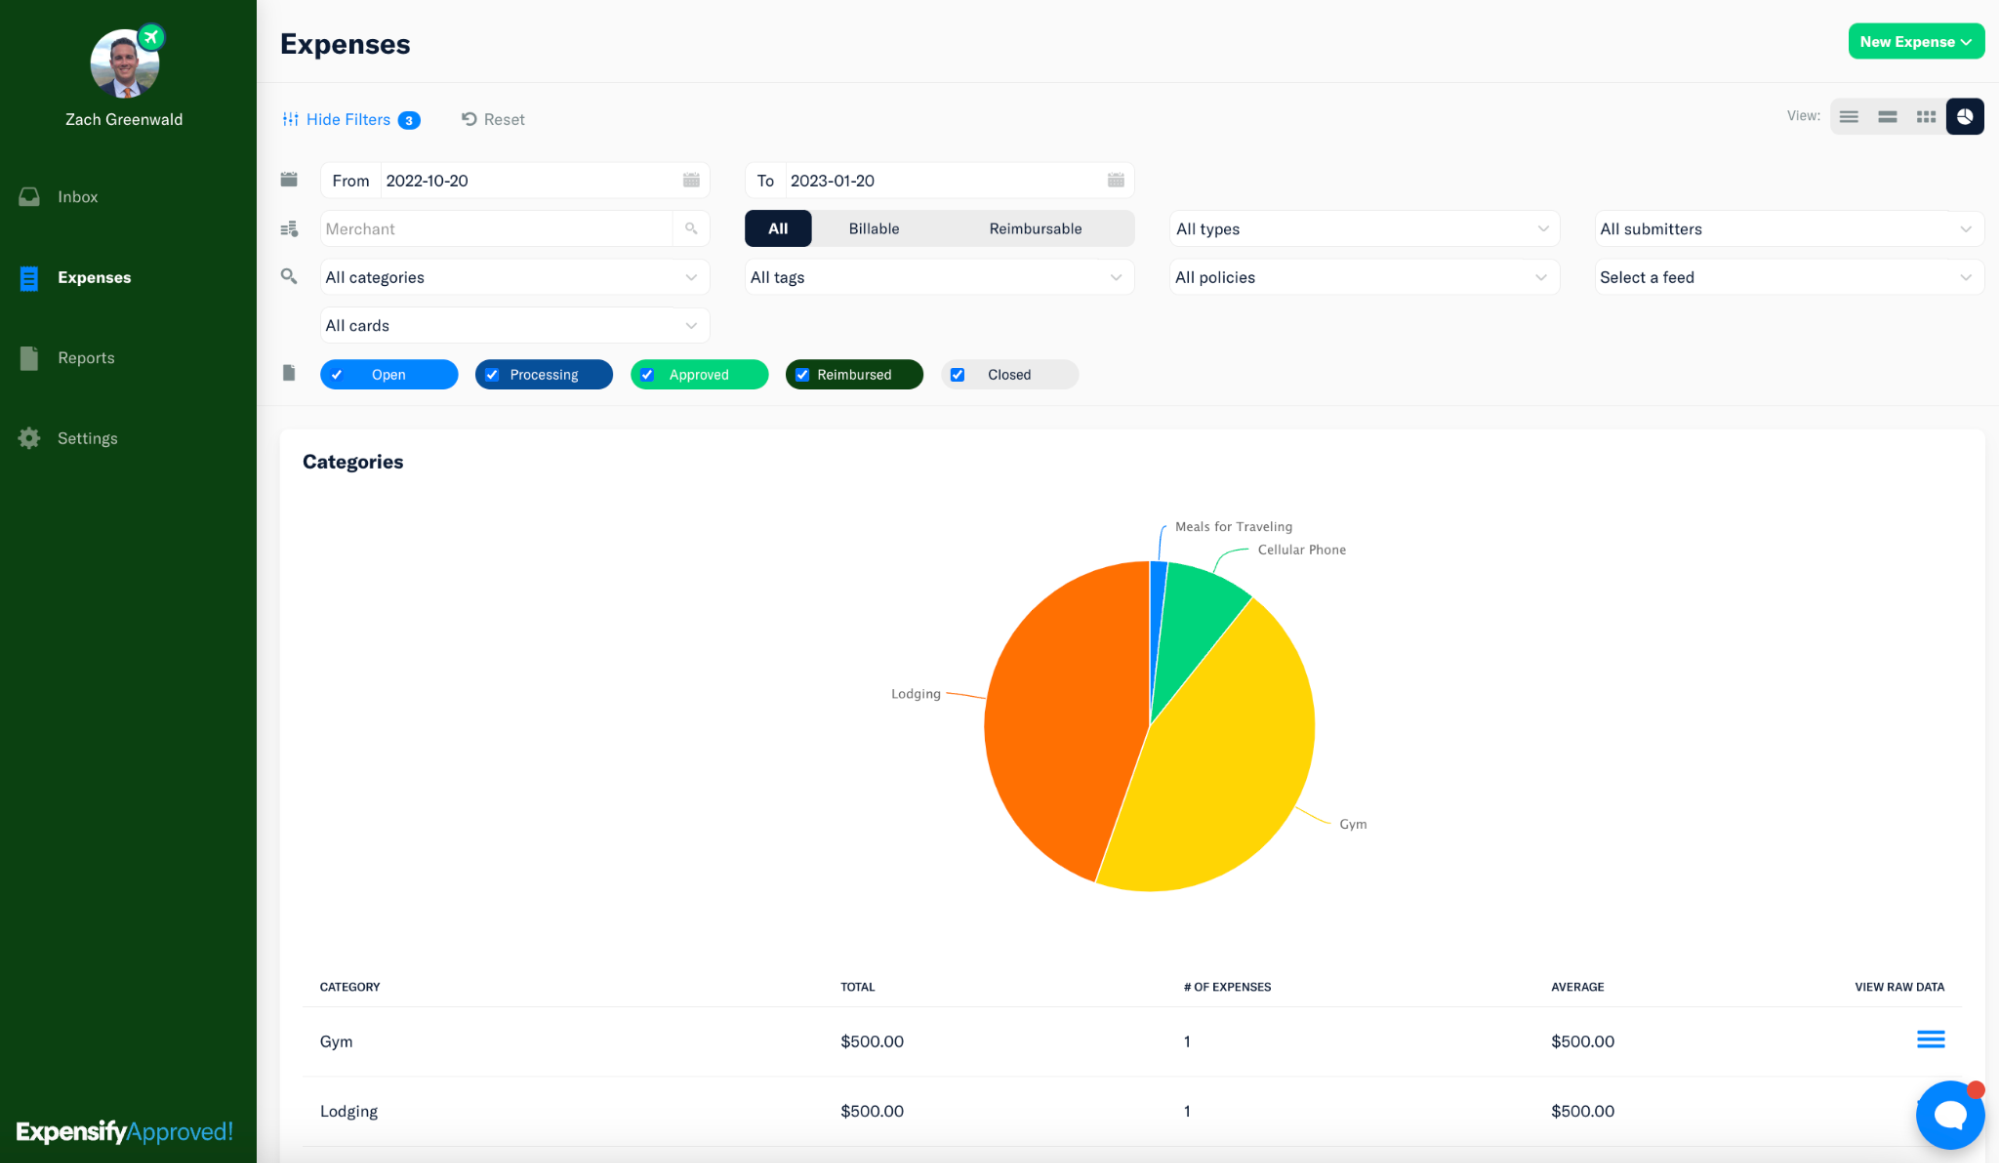
Step 13: Run monthly, quarterly, and annual reporting
At this stage, reporting is important, and given that Expensify is the primary point of entry for all employee spending, we make reporting visually appealing and wildly customizable.
- Head to the Expenses tab on the far left of your left-hand navigation
- Select the pie chart icon on the right top right corner
- Configure the filters to your preference
We recommend reporting:
- Monthly - for spend analysis on your GLs, active projects, and department spend
- Quarterly - for budget comparison reporting. Pull up your BI tool and compare your active budgets with your spend reporting here in Expensify
- Annually— Run annual spending trend reports with month-over-month spending analysis to prepare for the upcoming fiscal year.
Step 14: Set your Subscription Size and Add a Payment card
Our pricing model is unique in the sense that you are in full control of your billing. This means you have the ability to set a minimum number of employees you know will be active each month, and you can choose which level of commitment fits best. We recommend setting your subscription to Annual to get an additional 50% off on your monthly Expensify bill. In the end, you’ve spent enough time getting your company fully set up with Expensify, and you’ve seen how well it supports you and your employees. Committing annually just makes sense.
To set up your subscription, head to:
- Settings > Workspace
- Select Group
- Scroll down to Subscription
- Select Annual Subscription
- Enter the number of employees you know will be active each month
- Enable Auto-Renew and Auto-Increase Subscription Size
Now that we’ve gone through all of the steps for setting up your account, let’s make it official so there are no interruptions in service as your employees begin using Expensify. We handle payments for our service via a payment card, and to add one:
- Go to Account > Settings > Payments
- Select Add Payment Card
- Enter your name, card number, postal code, expiration, and CVV
- Click Accept Terms
You’re all set!
Congrats, you are all set up! If you need any assistance with anything mentioned above or would like to understand other features available in Expensify, reach out to your Setup Specialist directly at new.expensify.com. Don’t have one yet? Create a Control Workspace, and we’ll automatically assign a dedicated Setup Specialist to you.


